January marks my gluten-free anniversary and at the end of this month, I will have been gluten-free for three years. So, I thought for this post that I would reflect on a few things I’ve learnt about being gluten-free along the way.
I’ve found that my love of cooking has really helped me accept the restrictions on my diet. It’s helped me to such an extent that I don’t often think of my diet as BEING restricted. I never really relied on ready meals and processed foods before so I don’t eat them now. I think if I had, then I would have found the transition much more difficult. Most meals cooked from scratch are naturally gluten-free anyway and those that aren’t can often be tweaked to be made so. If I’m ever feeling fed up (which isn’t often), I just pick up a copy of BBC Good Food magazine and remind myself of how much food I can still eat.
I’ve learnt that lots of people really aren’t clued-up with regards to alternative diets (and why should they be if it doesn’t affect them?) and that can lead to insensitive comments. I was talking to someone not so long ago about my diet and she remarked, “It sounds ghastly!” I really resented it. I felt like shouting, “Don’t say that! Take a look at my blog! Does my life look ghastly to you? Look at all the scrummy food I eat!!!!!”
I’ve been blogging now for just over a year and I LOVE IT! I wish I’d started it sooner. It’s made me much more creative than I ever thought I could be because I’m always thinking up new things to try and new ways of doing them. I don’t like being given ‘no’ for an answer and if there isn’t an immediate solution for how to achieve something, I’ll sit down and figure it out.
Linked with blogging has been the discovery of a vibrant gluten-free community in the Twittersphere. I felt very isolated before I joined Twitter. I didn’t know anyone who ate like me. It was great to ‘meet’ people who have the same dietary issues as me and who understand what it’s like. There is always an interested/sympathetic ear and a lot of active tweeters also have blogs. Check out my links page for my favourites.
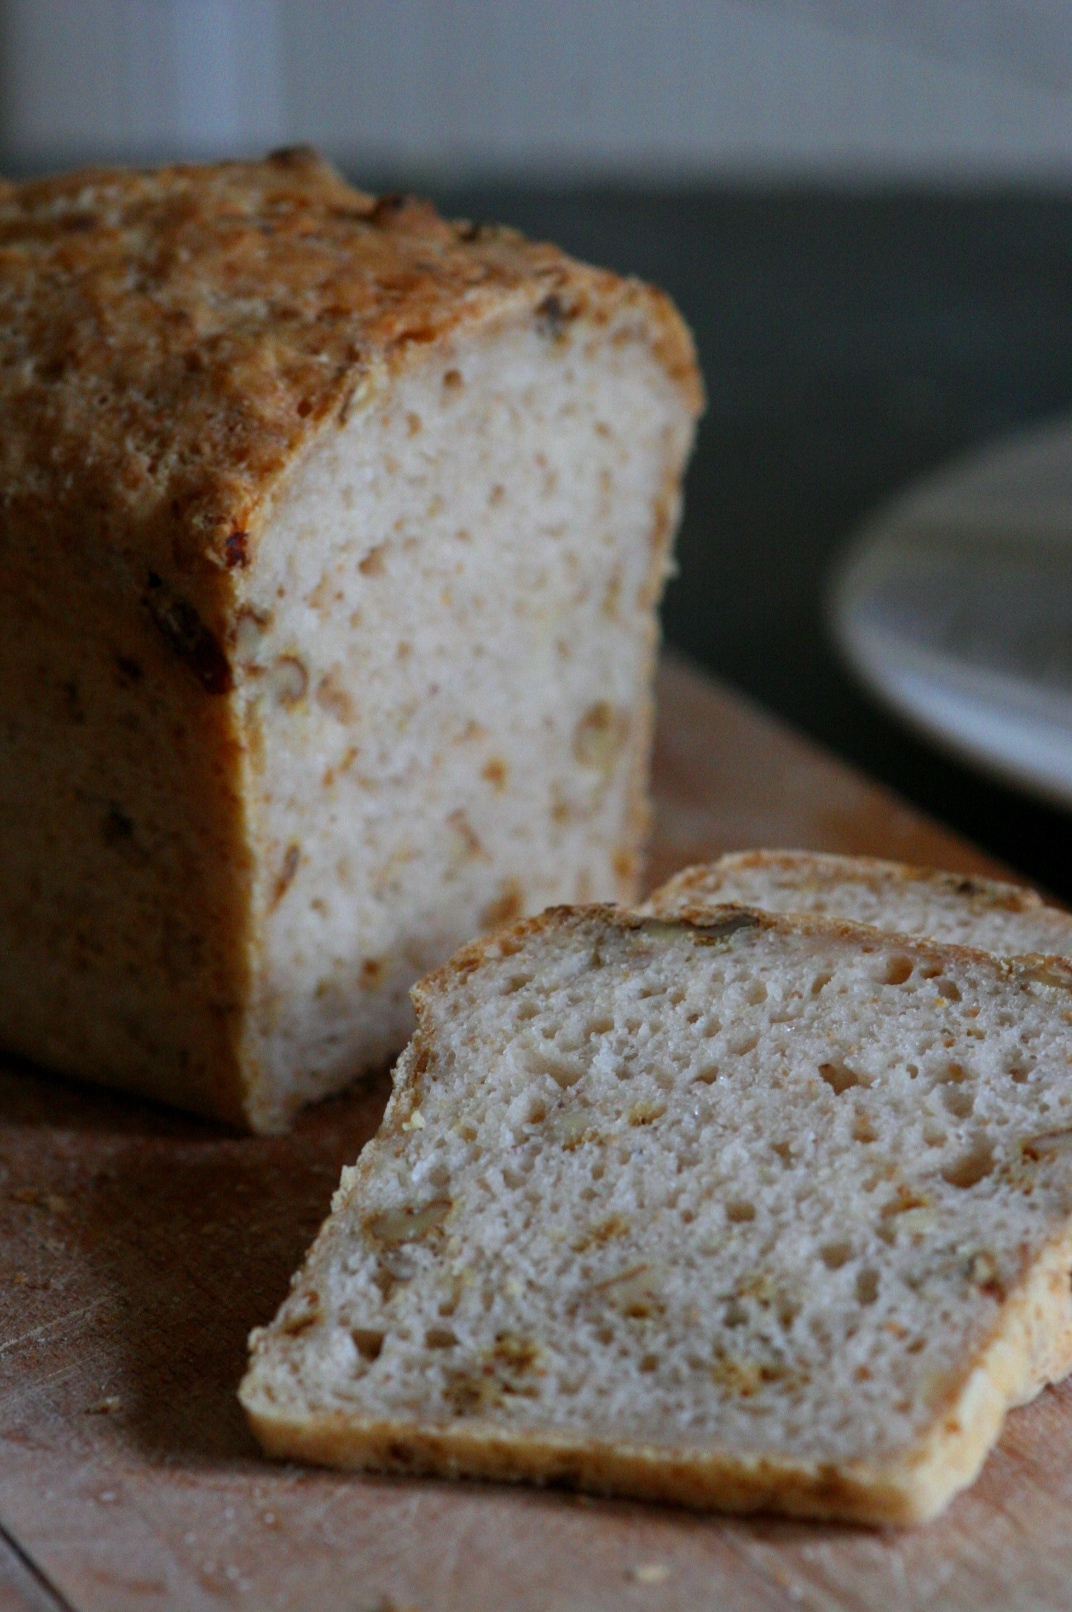
I’ve come to accept that some gluten-free foods will not be exactly the same as their glutenicious counterparts, such as bread. Gluten-free bread does not have that tender candyfloss softness and lightness that you find in wheat bread. I’ve learnt not to expect it and I’m no longer disappointed when I don’t achieve it – I appreciate gluten-free bread for what it is: fresh homemade gluten-free bread is most definitely not the weird-tasting cardboard that a lot of people would think: it’s fragrant and delicious with a rustic texture.
I shied away from making bread for a long time and had some notable disasters in the early days. I almost gave up but I don’t like being beaten and I’ve enjoyed the intellectual challenge. I’ve also been spurred on by the fact that I’m really not keen on that brand of gluten-free bread that everyone raves about. I find that it dissolves into a gluey mass in my mouth and clogs my teeth. If you haven’t already, do check out my recipes for flatbread wraps, sunflower and linseed loaf, focaccia with rosemary and sea salt and stromboli. I’m currently working on recipes for tortillas, pitta breads, schiacciata (traditional Tuscan flatbread) and croissants for this blog and LiveGlutenFree has just published my latest recipe for them:

Naturally gluten-free cheese and red chilli mini cornbreads
This walnut bread has a beautifully nutty flavour, has a wonderfully domed top (it won’t look like it’s risen much when you come to put it in the oven but it continues to rise whilst baking) and it slices cleanly. I’ve found with homemade gluten-free bread that when toasting, it takes a little longer than normal bread. Also, it’s much damper (listen to it sizzling in the toaster!), which I put down largely to the egg content, although I think the psyllium also has a part to play. After it has been toasted, it pays to allow the steam to escape for a few minutes before buttering to avoid it going mushy. I just leave it in the toaster for a few minutes. In the past, I’ve advocated freezing gluten-free bread, but I’m no longer convinced of its suitability: I think the ice crystals make it too wet and it goes a bit claggy, even when toasted. I’ve started making smaller loaves which I use up by toasting from Day 2 onwards.

Serving suggestion: Toasted gluten-free walnut bread with grilled goat’s cheese and honey
Gluten-free walnut bread
Makes 1 small loaf
4 tsp psyllium husk
4 tbsp cold water
100g gluten-free plain (all-purpose) flour
80g gluten-free brown bread flour*
100g potato flour
12g tapioca flour
2 1/2 tsp caster sugar
1 1/2 tsp gluten-free baking powder
Heaped 1/4 tsp Vitamin C
Scant teaspoon fast-action yeast
1/2 tsp salt
50g walnuts, coarsely chopped
1 egg white
1/4 tsp xanthan gum
50ml warm milk
250ml warm water
25g butter, melted
You will also need an electric whisk, a 1lb loaf tin and a couple of supermarket carrier bags or a large plastic bag.
Mix the psyllium husk with 4 tablespoons (60ml) of cold water in a small bowl or mug and give it a good stir. Set aside.
Sift the flours, sugar, baking powder, Vitamin C and yeast into a large bowl. Give it all a good mix with a balloon whisk and then add the salt and chopped walnuts. Give it another stir to evenly distribute the nuts then make a well in the centre.
In a scrupulously clean bowl, whisk the egg white with an electric whisk for about 20 seconds until it becomes light and frothy. Sprinkle over the xanthan gum and continue to whisk until the egg becomes white and marshmallowy. BE VIGILANT! The egg white will suddenly take on a life of its own and will start to swarm up the beaters. To avoid fouling up the motor on your whisk, make sure to withdraw the beaters and the egg white will swarm back down them again.
Give the psyllium husk a good stir. It should have become a solid jelly. Give it a good stir and scoop this into the well in the flour mixture. Then pour in the milk, water, melted butter and egg white. Stir the liquids into the dry ingredients with a loose folding motion until you have a very wet and sticky batter. Scoop the batter into your lined tin and smoothe the surface with an oiled spatula or palette knife. Form a tent over the tin with the carrier bags and leave to rise at room temperature overnight (for about 12-14 hours).
When you are ready to bake the bread, preheat the oven to 190°C (my oven is fan-assisted, so adjust accordingly). Bake the bread for 10 minutes, then lower the temperature to 180°C and continue to bake for another 30 minutes.

Love walnuts in my bread! Claire is there a substitute for eggs in this recipe.. Love your pix tooo…
Thank you! Me too. Love walnuts! You *can* leave the egg white out completely – it will rise but not as much. If so, I would be inclined to make a shallower bread – I think less weight would help the rise – and perhaps a tiny drop more water. I haven’t really experimented with egg replacer. Can it be whisked like egg white? That *might* work. I know some gluten-free bakers use apple puree but I’ve never tried it so can’t comment on how effective that is. Sorry I’m being a bit cagey but I would hate to suggest something that I hadn’t tried!!!
It’s really inspiring to read about how you’ve turned something lots of people would think of as a problem into something so positive! That bread looks amazing, especially with the cheese & honey.
Thank you, Sarah. I really appreciate you taking the time to comment. Walnuts and goat cheese are typical produce of the area in southwestern France where my sister has a house and where I’ve spent many a happy summer. It’s where I discovered the delights of goat cheese toasted with honey drizzled on top 🙂
I agree with Sarah! I just had dinner with a friend who is also gluten-free and she left me inspired to learn more. Then fast forward to today when I come across your blog (by way of you visiting mine -thank you!) and the inspiration and education continues. Looking forward to diving in and following along!
Thank you so much, Andrea. I’m really touched by your interest. I hope that you enjoy my recipes 🙂
Your photos are just lovely and although I’m not on a special diet, I have several friends who are. Your story (and anniversary) have given me some insights into how they have had to adapt. I’ll have to forward your site onto them.
And, thank you for dropping by yesterday!
Allison
Thank you very much, Allison. I really appreciate your kind comments and for recommending my blog to your friends.
Claire 🙂
My husband has just started taking psyllium husk but I am having trouble with it! He will be well impressed if I can incorporate it into a recipe, thanks! (love the idea of goats cheese and honey on it). Cath
Thanks, Cath. Goat’s cheese and honey is yummy. I’ve tried psyllium in some smoothies – it’s quite a palatable way of upping your fibre content 🙂
I might try that as I really don’t like the texture when it’s taken with water! Thanks for the advice, Cath
This bread looks beautiful. It must have been just amazing with the soft cheese!
Thank you! Grilled goat’s cheese with honey and walnuts IS delicious.