Archives for posts with tag: orange

gluten-free and dairy-free orange and almond biscuits 2

I’ve had a jar of ground almonds in the cupboard for some time and I’ve been wondering what to do with them. I’ve used them before in my gluten-free and egg-free double-mint-choc-chip brownies, but I fancied something a little different. So, they’ve just sat there. And sat there. And sat there… 

Last week, we arranged for some friends to come round for afternoon coffee. I always bake something when people come round for coffee. (Hey, who am I kidding? I always bake something, whether people come round or not…!!!!) But this time it was a little more challenging. Not only did it have to be gluten-free for me (and, coincidentally and unbeknownst to me at the time, also for my friend’s wife!) but it also had to be potato-free. In the normal scheme of things, this wouldn’t be a problem. Potatoes don’t figure hugely in the world of cakes and biscuits… Unless you’re gluten-free, and then they figure massively, as one of the main constituents of gluten-free flour blends is, of course, potato flour (starch).

I could have faffed about making up a blend without potato flour because I have a veritable array of flours in the cupboard but I’m not sure of the ratios of flours to starches in commercial flour blends, I was out of cornflour (cornstarch), and didn’t think a large proportion of tapioca flour (starch) would be wise. Then I remembered the ground almonds in the cupboard and it all fell into place.

And so these gluten-free and potato-free orange and almond biscuits were born. They also have the added bonus of being dairy-free as well. This recipe uses a tiny amount of flour – I used rice flour – but if I were to make them again and didn’t have the potato-free condition, I would use a plain (all-purpose) blend.

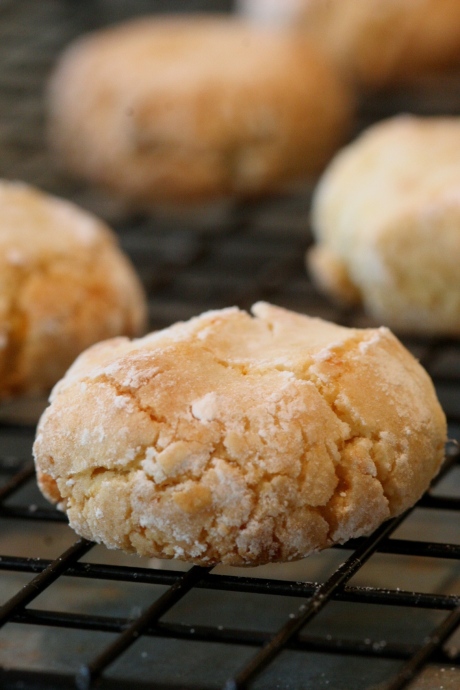
gluten-free and dairy-free orange and almond biscuits

Serving suggestion: gluten-free and dairy-free orange and almond biscuits with a cappuccino and the Sunday papers

Gluten-free orange and almond biscuits

These biscuits are beautifully light and moist: the almond and orange flavourings are subtle, warming and aromatic. They look delicious served with a light dusting of icing sugar (which I forgot to do before I took the pictures – doh!) You need a very light hand when mixing the dough because you don’t want to knock all the air out of the egg whites. It’s sufficient to mix only until the egg white has disappeared and you are left with a lumpy, crumby mixture.

Makes 10-12 biscuits

90g ground almonds
45g icing (confectioner’s) sugar + extra for rolling and dusting
1 tbsp rice flour or gluten-free plain (all-purpose) flour
Zest 1 large orange
1 egg white

You will also need an electric whisk and a baking (cookie) sheet lined with baking parchment.

Preheat the oven to 200°C.

Place the ground almonds in a mixing bowl and sift in the icing sugar and the rice flour. Give it a swirl with a balloon whisk and add the orange zest. Gently rub in the orange zest with your fingertips to evenly distribute it throughout.

Whisk the egg white in a scrupulously clean bowl until it reaches the stiff peak stage. Add this to the almond and sugar mixture and gently stir in with a metal spoon. Don’t over-mix but stop when the egg white has disappeared even if you do not have one ball of dough.

Using your hands, form small balls of dough, with a diameter about the size of a 10p piece. Roll the balls gently in the extra icing sugar, place on the baking sheet and gently squash with your fingers. Bake for 10 minutes until risen and golden. Carefully remove from the baking sheet with a palette knife and cool on a wire rack. Serve lightly dusted with icing sugar.

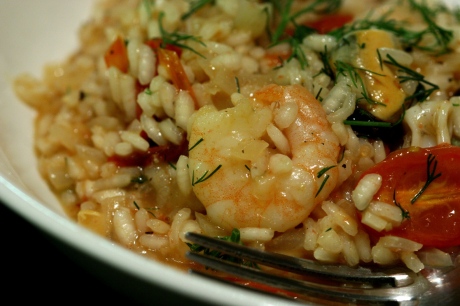
naturally gluten-free seafood risotto with roasted tomatoes, orange and fennel

Happy New Year! I hope everyone had a happy and a healthy festive season. We, in the GFN household, had a fabulous time – lots of family, friends and food. My son, just shy of his second birthday, really “got” Christmas this year. It was lovely to see him fascinated by the Christmas tree, trying to see his reflection in the baubles and pointing to all the stars and lights. He also managed to grasp the concept of “presents” and had great fun ripping into the wrapping paper and playing with the toys and books he found inside.

I also did extremely well on the present front – the highlights including a Lakeland voucher (yippee!) and a library of cookery books, two of my favourites being Italian Home Baking by Gino D’Acampo and The Kitchen Diaries by Nigel Slater. The first book is a cornucopia of tasty Italian baked goodies which are ripe for a gluten-free makeover (watch this space! I’ve already made Version 1.0 of his panettone classico…) The second book is a pure joy to read – a year of Nigel Slater’s life in his kitchen and garden and the recipes which came out of it.  I’ve almost finished it in about three sittings and I’m planning to go back to the beginning as soon as I’ve finished it to pick out some recipes to make. What I love about him is that he is not in the slightest bit cheffy or precious, he eats according to what’s in season (which I intend to do more of this year) and rustles up great recipes out of sometimes what is just left in his fridge or cupboard. This recipe has evolved out of my having been inspired by him. The cupboards were looking a bit bare last week and I remembered that I had a couple of sea bass fillets in the freezer. These were duly defrosted and we had them pan-fried with leftover roasted cherry tomatoes and basmati rice dressed with lemon, olive oil and fresh dill, left over from the smoked salmon pâté I made for a family lunch. This got me thinking of seafood risotto with roasted tomatoes and flavoured with orange and dill.

naturally gluten-free seafood risotto with roasted tomatoes, orange and fennel 2

Naturally gluten-free seafood risotto with roasted tomatoes, orange and dill

Serves 2 generously

250g baby plum tomatoes
2 tbsp olive oil, divided
salt and pepper
1 litre fish stock
1 medium onion, finely chopped
2 cloves garlic, finely chopped
175g Arborio risotto rice
125ml white wine
zest of half an orange, pared into strips with a potato peeler
225g mixed cooked seafood (I used king prawns, mussels and squid)
1 tbsp fresh dill, finely chopped

You will also need a non-stick roasting tin and a large frying pan (skillet).

Preheat the oven to 190°C (my oven is fan-assisted, so adjust accordingly). Slice the tomatoes in half lengthways, put them in a non-stick roasting tin, drizzle with 1 tablespoon of the olive oil and season with a little salt and pepper. Gently shake the tin so that the tomatoes are evenly coated and roast them in the oven for 30 minutes.

While the tomatoes are roasting, place the fish stock in a small saucepan and heat to simmering point over a gentle heat. Heat the remaining tablespoon of olive oil in a large frying pan (skillet) over a low to medium flame and add the chopped onions. Fry for several minutes until softened, pale and translucent. Add the minced garlic and continue to fry gently for another couple of minutes. Add the rice and stir to thoroughly coat the grains with oil.

Pour in the wine and bring to the boil. Simmer gently, stirring all the while. When the wine has been absorbed by the rice, add a ladleful of the fish stock and the strips of orange zest. Gently stir until all the fish stock has been absorbed. a ladleful at a time, stirring until it has all been absorbed before adding the next. Before adding the final ladleful, fish out the strips of orange zest and discard. After adding the final ladleful, stir in the mixed seafood and half the chopped dill and gently fold in the roasted tomatoes. Stir gently until the stock has been absorbed and you are left with creamy and al dente rice. Taste and adjust the seasoning and serve immediately, garnished with the remaining dill.

gluten-free white chocolate orange and pistachio biscottini_small

Another week, another challenge set by Caleigh over at GlutenFree[k]! This week, the inspiration is “Christmas Present”, as in an edible Christmas gift.

Christmas shopping shouldn’t be stressful and yet it so often is for me. I can feel that it is a somewhat pointless exercise in finding something tenuously appropriate for someone within a given budget. Time after time frustratingly I find the perfect present for someone which is, unfortunately, laughably out of my budget…or I find the perfect present for someone who I’m not buying for at all…or I find the perfect present for ME…which most certainly isn’t the plan! And I’d hate to think that people who are buying me presents are going through exactly the same stress too.

Of course I’m very appreciative of any presents that are bought for me but I think that there is no better way to show someone that you care than to make something for them, especially if you’re on a budget. The time and thought that go into creating a gift are of far more value to me than money. And as cooking is my thing, an edible gift is what immediately springs to mind.

gluten-free white chocolate orange and pistachio biscottini 3_small

Gluten-free white chocolate, orange and pistachio biscottini

I’ve called these biscotti “biscottini” because they seem much smaller than normal ones.

Makes 30

125g gluten-free plain (all-purpose) flour
25g tapioca flour
100g caster sugar
1 tsp gluten-free baking powder
1/2 tsp xanthan gum
100g good quality white chocolate, coarsely chopped*
90g shelled pistachios, coarsely chopped
Zest 2 oranges
2 eggs, lightly beaten

You will also need two baking (cookie) sheets lined with baking parchment.

Preheat the oven to 180°C (350°F – my oven is fan-assisted, so adjust accordingly). Line two baking sheets with baking parchment.

In a bowl, sift the flours, caster sugar, baking powder and xanthan gum. Stir in the chopped chocolate and pistachios and orange zest. Make a well in the centre and stir in the egg to make a sticky dough. You may need to get your hands in there to knead it together. It will seem at first as though there’s not enough liquid but persevere and it will come together.

Tip the dough out of the mixing bowl and divide in half. Shape each half into a rectangular log, about 25cm long by 5cm wide, and place on one of the baking sheets. Make sure you leave space in between them to allow for any spreading.

Bake for 30 minutes, then remove from the oven and allow to cool. The loaves are easy to remove from the baking parchment with a palette knife and place on a wire cooling rack.

Reduce the oven temperature to 140°C (275°F). Cut each loaf into thin slices (about 5mm wide), on a slight diagonal, using a sharp bread knife. Spread the biscuits out over both the baking trays (I use fresh baking parchment on the tray I’ve already used) and bake for a further 20 minutes, turning them halfway through the baking time. Remove from the oven and place on wire cooling racks.

When cool, place in either a fancy gift bag, gift box, tin or jar and give to your loved one.

* I used a luxury supermarket brand white chocolate. If you go for something cheaper, then I would suggest adding a teaspoon of vanilla extract to the dough when you stir in the eggs.

gluten-free turkey kiev bites

Comfort food isn’t just about stews, casseroles and mashed potato to me. It’s also about burgers, fishfingers and, dare I utter it?, chicken nuggets. (I know, I know…! What can I say? They speak to my inner child, so shoot me…!) All of these products, if you’re on a completely unrestricted diet, you can pick up ready made and reasonably cheaply whenever and wherever the whim takes you.

There is also an ever-burgeoning array of Free From products you can get your mitts on now and I’m sure if I’d got in the car and gone down to my local Sainsbury’s, I could have got myself something of that ilk without any hassle. The thing is, and I hate to say it because I’m grateful, really I am, that gluten-free options are more readily available now than they’ve ever been, is that much of it, unfortunately, is a load of ****. It’s jam-packed full of salt, fat and sugar – more so than ‘normal’ convenience food. If you don’t believe me, pop along to my fellow blogger Laura’s post where she lays it all out in tabular form.

A few years ago (before I realised that homemade gluten-free pastry didn’t inhabit the land of unicorns), I bought a ready-made beef pie (I’ll spare the brand its blushes). I was so excited. I got it home, slapped it in the oven and salivated whilst it heated through. I bit into it. Yuk. And I’m not talking about the pastry either. I’m talking about the beef. It was salty, grey, gristly, bland and gelatinous and, well, it just didn’t taste like beef. I’ve seen dog food that, quite frankly, looked more appetising.

Why? I asked myself. Beef is beef. Beef is naturally gluten-free. It should taste the same as beef in a ‘normal’ pie.  Did the beef taste disgusting because the cost of manufacturing the gluten-free bit of the pie made decent meat prohibitively expensive? Or was it the producer’s reasoning that our poor, deprived tastebuds have become so desensitised from eating cardboard bread that we would be grateful for anything, however meagre, that was tossed in our direction?  Both thoughts made me feel angry and not a little sad and I vowed that I would make most of my own food from scratch from that time forward.

In other news, I can’t believe that the month goes by so quickly. The other day, my most recent blog post and recipe for LiveGlutenFree went live. Here’s a sneaky peek at my gluten-free chocolate, orange and cardamom melting moments. I’m really into cardamom at the moment and I’ve started grinding it into my peppermint tea, along with cinnamon, chocolate and dried orange peel – sounds bizarre, but it really works! Melting moments are self-explanatory really – biscuits that melt as soon as you put them in your mouth. They’re usually piped with a star nozzle and sandwiched with buttercream but that’s a bit retro-and-not-in-a-good-way for me, so I used a plain cutter and drizzled them with chocolate flavoured with orange. If you like what you see, do click on the link to have a look at the recipe.

Gluten-free chocolate, orange and cardamom melting moments

Anyway, without further ado, here are the stars of the show: mouth-sized morsels of turkey with a garlicky, herby centre, encased in crispy gluten-free breadcrumbs. Serve with boiled potatoes and a green salad or, as I much more sophisticatedly did, with sautéd potatoes and haricots blancs in a tomato sauce chips and beans.
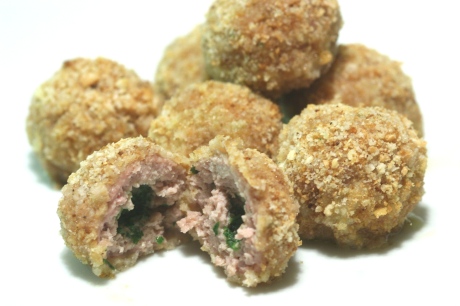
gluten-free turkey kiev bites

Gluten-free oven-baked turkey Kiev bites

Serves 4 (makes 20 turkey Kiev bites)

For the garlic parsley butter:
50g butter, cubed
1 clove garlic, peeled and crushed
1 tbsp flatleaf parsley, chopped

For the breadcrumbs:
150g gluten-free white bread
1 tbsp olive oil
1 tsp garlic granules
1/2 tsp lemon pepper
1/2 tsp salt

500g lean minced (ground) turkey
gluten-free plain (all-purpose) flour
1 egg, lightly beaten

You will also need a food processor, a sheet of greaseproof paper about 30cm x 30cm and a baking (cookie) sheet, lined with baking parchment/greaseproof paper.

First of all, make the garlic parsley butter. Place the cubed butter, crushed garlic and coarsely chopped flatleaf parsley into the food processor and whizz on high speed until everything is well-incorporated and the mixture is soft and flecked with pale green.

Now, you need to form the butter into a log shape about 1cm in diameter and 20cm in length. This is a lot easier to do than to describe, so apologies if it’s a bit long-winded. It’s a *bit* like rolling sushi, if you’ve ever done that before. Lay the piece of greaseproof paper on the work surface and spoon the garlic parsley butter in a blob about halfway along, and 5cm from, the bottom edge. (Now, I’m right-handed, so if you’re left-handed, you might want to do the next bit the other way around). Holding the bottom edge of the greaseproof paper against the work surface with your left hand, bring the top edge of the greaseproof paper over the butter so that it snugly encloses it. Keeping your left hand in place to keep the bottom layer of paper secure, use the blade of your right hand to gently push and nudge against the top layer of paper at the base of the enclosed butter. As you push, the butter travels up the greaseproof paper and it should form itself into a log: the more you push, the thinner it should get.

When the log is the right size, trim off the excess paper at the bottom and twist the ends to secure the butter. Place in the freezer until ready to assemble the Kiev bites.

* Now, make the breadcrumbs. Tear the slices of gluten-free bread into pieces and place in the food processor. Blitz until you have made coarse crumbs. Heat a frying pan over a medium to high heat until the pan is smoking and add the tablespoon of olive oil. Tip the breadcrumbs into the frying pan and fry for several minutes. These burn very easily, so make sure you keep stirring and breaking up any clumps of crumbs caused by the oil. The breadcrumbs are ready to come out when they have turned a golden-brown colour and sound crisp against the bottom of the frying pan. Tip the crumbs back into the food processor and add the garlic, lemon pepper and salt. Blitz again until fine. Tip out into a shallow bowl and set aside.

Now, tip the minced (ground) turkey into a mixing bowl and gently massage with your hands to create a more homogeneous mixture. Form into 20 balls of 25g each. Using your index finger, make an indentation in each (making sure you don’t poke through to the other side).

Preheat the oven to 180°C (my oven is fan-assisted, so adjust accordingly). Remove the butter log from the freezer and cut into 20 equal slices. Push a slice into the indentation in the ball of turkey meat. Pinch the meat closed and then roll the ball between the palms of your hands so that the meat completely seals the slice of butter. Repeat with the other balls of mince.

This next bit might sound a bit pernickety, but it’s the only way if you don’t want to end up with goujons for fingers… Basically, the rule is: one hand for dry, the other hand for wet. Place a shallow bowl with the beaten egg to your left, the plate/tray of turkey balls in the middle and a plate with a few tablespoons of gluten-free plain (all-purpose) flour and the shallow bowl of breadcrumbs to your right.

Using your right hand, coat a turkey ball in flour then drop gently in the bowl of egg. Using your left hand, make sure the ball is evenly coated with egg before dropping it gently into the bowl of breadcrumbs. Using your right hand, scoop and pat the breadcrumbs gently over the ball before placing it on a baking (cookie) sheet lined with baking parchment/greaseproof paper.

Bake in the oven for about 20 minutes or until the Kiev bites are golden-brown and cooked through.

* This is how I now make all my breadcrumbs. If I make a larger batch than I need, I put the excess into a sealed container in the refrigerator and keep them there up to a week. If they’ve been in contact with raw meat, like in this recipe, I only use them when I’m going to cook with them (rather than using to sprinkle on fishy pasta dishes).

One thing I really love about the Great Gluten-Free Recipe Challenges, set so fiendishly by Caleigh over at GlutenFree[k], is that they really ARE challenging. The additional restrictions and essential ingredient, vegan as well as gluten-free and beetroot this time, make me think very hard and put me out of my comfort zone. This challenge has been no exception.

I’ve come round to beetroot only in the last few years when I’ve had it grated raw in salads. I’ve had a devil of a job tracking it down though. The only type I’ve been able to find in the supermarket is cooked beetroot, swathed in plastic and drenched in vinegar: yuk.

I’ve started using a High Street greengrocer to buy my veggies, rather than going to the supermarket: it’s cheaper and the produce is generally of much better quality. I’ve talked before of my pet peeve about tomatoes. The tomatoes that you can buy at this shop are beautifully red and flavoursome and you get almost twice as much for your money. I decided to pay them a visit and, sure enough, there were bundles of raw beetroot in all their purple glory.

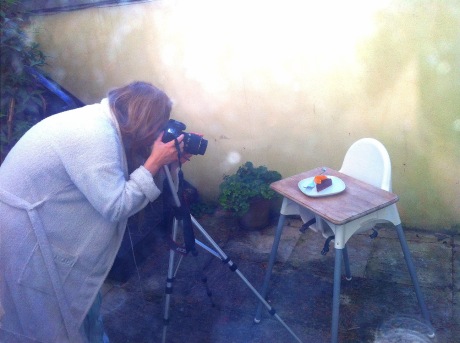
Caught in the act: a sneaky photo taken by my husband through the kitchen window this morning!

This is my first foray into the world of silken tofu but it won’t be my last. I know that I can rely too much on milk, cream and eggs and this seems a perfect alternative when I want to make desserts and quiches. The filling is beautifully creamy and the beetroot not only adds an earthy, but not intrusive, undertone, but a gorgeous purple colour.

Gluten-free and vegan chocolate, beetroot and orange mousse cake

Serves 8-12

200g gluten-free, vegan biscuits (I used Sainsbury’s Free From Rich Tea biscuits)
50g dairy-free spread
200g peeled raw beetroot, cut into 1cm dice
350g silken tofu
3 tbsp caster sugar
zest 1 large orange
60ml dairy-free single cream (I used Alpro soya single cream)
4 level tbsp cocoa powder
170g gluten-free, vegan plain chocolate (I used Kinnerton), broken into squares

You will also need a 20cm diameter, loose-bottomed non-stick cake tin

Pre-heat the oven to 180°C (my oven is fan-assisted, so adjust accordingly).

Crush the biscuits to a coarse meal, either in a food processor or put them in a plastic bag and give them a good bashing with a rolling pin. Put the dairy-free spread in a small saucepan and melt over a low flame. When the spread is completely liquid, add the crushed biscuits and stir until completely combined. Tip the mixture into the cake tin and press firmly into the base with your fingers. Put in the oven and bake for about 10 minutes or until golden-brown. Remove from the oven and set aside. Reduce the temperature of the oven to 160°C.

While the biscuit base is baking, place the diced beetroot in a saucepan and cover with cold water. Bring to the boil and cook for about 15 minutes until tender. Drain and blend to a smooth purée.

In a large bowl, place the silken tofu, the caster sugar, the orange zest and the dairy-free single cream. Whisk for several minutes until smooth. Sift the cocoa powder over the mixture and stir in manually with the beaters (to avoid spraying cocoa powder all over the kitchen!) before whisking again until well-combined.

Place the chocolate pieces in a heatproof bowl over a small saucepan of simmering water (make sure the bottom of the bowl is not touching the water), and stir until melted. Stir the melted chocolate and beetroot purée into the silken tofu mixture. Pour the mixture onto the biscuit base, cover loosely with foil and bake for 30 minutes. Remove the foil and return to the oven for a further 30 minutes. Remove from the oven and cool in the tin. When cool, put in the refrigerator and chill for several hours before serving.

Serve chilled with dairy-free single cream.

When I got the message from Caleigh over at Gluten Free[k], inviting me to take part in the Great Gluten-Free Recipe Challenge that she was hosting, I was really excited. Firstly, it’s great to feel part of a community that not only understands this part of my life because it’s part of theirs too but that also celebrates it and says, “You know what? I’m not going to accept this restriction on my diet lying down. Gluten-free food can be just as delicious and I’m going to show you. So there!” One of the reasons that I started blogging was that I didn’t know anyone else who ate the same diet as me, who suffered the same frustration in restaurants (WHY does the hollandaise have gluten in it?) and who suffered the same rudeness and ignorance from waiting staff. This is just one of my experiences: My husband and I went out to breakfast in a (not inexpensive) restaurant in Bristol. When I asked to not have the sausage and black pudding on my meal, it arrived without bacon as well. On questioning it, I was challenged with a surly “What’s the difference between bacon and sausages?!” Not the reaction I was expecting. “Um, cereal…” I said. Extra bacon was begrudgingly slapped down on a side plate next to me five minutes later. We never went back there.

Secondly  I love a challenge. The rules were laid down. Not only did we have a deadline – to publish our recipe on Monday 12th March – but we were also given an ingredient that had to feature prominently – orange – and the recipe had not only to be gluten-free (naturally!) but also dairy-free and almond-, hazelnut- and chestnut-free. I’m a firm believer that rules, rather than being restrictive, lead to even greater creativity. In my previous incarnation as an English teacher, I would dread setting my students a free creative writing task. Inevitably, I’d end up marking 30+ rambling, incoherent and grammatically-suspect pastiches of whatever they had been reading, watching, gaming the night before… “Enough already!” I said, “We need some rules!” Some of the most creative and beautiful pieces of work I’ve read, especially by lower-ability pupils, are in the style of the haiku – Japanese 17-syllable (no more, no less) poems – that distil a single thought into its pure essence, necessitating a purge of most articles (definite and indefinite), prepositions and pronouns. A valuable teaching tool which frees the child to focus on the simple beauty of creating metaphor.

So I had my rules. What to make? I had a choice: to make something which was naturally gluten-, dairy- and nut-free or, to make something which ordinarily would be jam-packed with them all and see how I could get around it. I chose the latter path (I like making things difficult for myself): gluten-free, I’m of course used to – dairy-free is another story. It would necessitate a journey of discovery into the world of vegan chocolate and soya substitutes. These days, rather than feel resentful at the food I can no longer eat in restaurants and cafés, if I see something that I really want, I go home and create it myself. This recipe is one such. Just before we moved to our new home in Cheltenham in December, my husband, our son and I needed to vacate our house while the prospective buyer measured up for her new kitchen. We found ourselves wandering aimlessly around Cabot Circus (the new shopping mall in the centre of Bristol) and decided to warm ourselves up with a brew at Costa Coffee. Sitting behind the glass counter, brazenly flirting with me, was an orange curd and chocolate ganache tart. I knew I’d have to have it sooner or later. So here it is. My culinary haiku which celebrates the symbiotic beauty that occurs when chocolate meets orange. Whether or not you eat it in seventeen bites is entirely up to you.

Gluten-free and dairy-free chocolate and blood orange curd tarts

This is a decadent and rich tart, perfect for sharing. You could, however, make smaller individual tartlets. I didn’t have any, but I think they would look beautiful garnished with physalis.

Makes 4 largish tarts, serves 8

For the pastry:
240g gluten-free plain (all-purpose) flour
1 tsp xanthan gum
65g Trex (or other vegan shortening), cut into cubes
½ medium egg, lightly beaten
cold water

For the orange curd:
1 blood orange
juice ½ lemon
4 eggs, lightly beaten
37g dairy-free spread (such as Pure soya spread)
150g caster sugar

For the chocolate ganache:
200g vegan and gluten-free plain chocolate, roughly chopped
250ml soya single cream (such as Alpro)
20g dairy-free spread

You will also need 4 13cm x 3cm loose-bottomed fluted tart tins*.

Preheat the oven to 180°C (fan-assisted; 365°F). In a food processor, blitz together the flour, xanthan gum and shortening until the mixture resembles coarse breadcrumbs. Add the egg and pulse to combine until the mixture resembles damp sand. Add enough cold water to bring the mixture together to a slightly tacky dough.

Tip the pastry out onto a lightly floured surface and bring together as a ball with your hands. Slightly flatten and cut into four portions. Form each portion into a ball and flatten into a disc about 5mm thick. I tend to do this with the heel of my hand, perhaps finishing it off with the rolling pin. Carefully lift the disc into the tartlet tin and press it in firmly. Remove the surplus pastry from around the rim, either with a knife or your thumb. Mend any tears in the base with surplus pastry and then prick it with a fork. Line the cases with baking parchment* and baking beans.

Place the cases on a baking sheet and bake them blind in the oven for 15 minutes. Remove the beans and parchment, return to the oven and bake until the pastry is cooked which should take about another 15 minutes (my pastry didn’t go golden but I’m assuming that this is because there is no butter). Remove from the oven and allow to cool.

To make the blood orange curd, wash the fruit and, using a potato peeler, pare the skin away from both the orange and the lemon in strips, making sure to leave the bitter white pith behind. Juice both the orange and the half lemon, making sure to remove any pips and pith. In a heatproof bowl, mix the juices and the rest of the ingredients, including the reserved orange and lemon peel. Place the bowl over a saucepan of simmering water, making sure that the bottom of the bowl is not in contact with the water, and whisk continuously until the soya spread has melted and the mixture has thickened to the consistency of double (heavy) cream. This should take about 20 minutes**. Strain the orange curd through a sieve into a jug to remove the strips of peel and distribute equally amongst the four pastry cases, smoothing with a palette knife. Allow to cool and set.

To make the chocolate ganache, place the chopped chocolate into a bowl. Put the soya cream and soya spread into a microwaveable jug or bowl and microwave on ‘high’ until the cream is bubbling and the soya spread has melted (this should take between a minute and a minute-and-a-half). Pour the hot cream mixture onto the chopped chocolate and stir with a spatula until the chocolate has melted and the mixture is a dark, glossy brown. Distribute equally amongst the four tarts, smoothing the surface with a palette knife. Allow to cool and set before cutting in half and serving.

* I use Heston Blumenthal’s trick which is to scrunch the parchment up several times and smooth it out before putting it in the tins.

**If the orange curd hasn’t set after 20 minutes, take the bowl of the heat, strain it through a sieve to remove the strips of peel and put it into a small saucepan over a very low heat. Mix 1 tsp of cornflour (cornstarch) with 1 tsp of water and add to the curd. Stir continuously until the curd has thickened up.

I love cookbooks. I have a small library that I’ve collected over the years. Some are Christmas presents and books that I’ve bought from new, including tomes by the likes of Delia Smith (High Priestess of the Temple of Yum), the ubiquitous Jamie Oliver, Nigel Slater (my very favourite cookery writer – I can’t wax sufficiently lyrical about his food), Antoinette Savill and Darina Allen and Rosemary Kearney (both really good gluten-free cookbooks). These are books I love going to on a regular basis as they’re jam-packed full of reliably delicious nosh.

But it’s the second-hand books that have come my way that I find the most intriguing. There are books that have been rescued from charity shops, such as Yugoslav Cookbook (obviously dating from pre-1992), written by Olga Novak-Markovič, head chef to President Tito (it was the chapter entitled “Fish, crustacea, shellfish and frogs” that made me fork out £1.50 for it!), those that I have inherited legitimately and those that started off as a fostering arrangement but ended up as a de facto adoption (ahem!). Some of these books date from the 1950s and 1960s and these are the ones that I love reading in bed at night before I go to sleep: Cookery in Colour, edited by Marguerite Patten, donated by my mum, Good Housekeeping’s World Cookery and The Daily Telegraph’s Favourite Recipes, both of which belonged to my husband’s father. I love the measurements given in imperial rather than metric, the Technicolor photographs and the quaintly clipped formal English of the instructions that crackles across the decades, evoking an era of the stiff upper lip and “Make Do and Mend”.

It is this last book that has given me the inspiration for today’s post. It contains a recipe for Prince Charles’s christening cake (!) and others submitted by Daily Telegraph readers, along with their photographs. I have yet to try the “delicious, nutty flavoured Fruit Scone [which] has enhanced Mrs. J. E. Donald’s reputation as a hostess”(!) but, as I was flicking through, the vanilla custard biscuits, originally made with a mix of ‘cooking fat’ and ‘margarine’ caught my eye. I’ve updated them somewhat by using decadent (!) butter, orange extract and a dark chocolate coating and have cooked them for longer at a lower temperature. They’re beautifully short and melt in the mouth.

Gluten-free chocolate-dipped orange custard biscuits (cookies)

The orange flavour in these biscuits is quite subtle so feel free to add more orange extract if you want a more citrussy flavour.

Makes 12-15 biscuits

115g unsalted butter, softened
85g caster sugar
1 tsp orange extract
170g gluten-free self-raising flour
2 heaped tbsp custard powder
100g gluten-free plain chocolate (I used Tesco’s own Continental 74% Plain Chocolate, but this does contain soya)

You will also need a solid baking sheet and a 5-6cm biscuit (cookie) cutter

Preheat the oven to 160°C (fan-assisted). In a medium-sized bowl, cream together the butter and the sugar with a fork. Add the orange extract and stir to combine. Sift the flour and the custard powder into the mixture and mix together. At first it will seem like the mixture will never come together because it’s too dry but it will gradually form a lump with lots of dry loose bits in the bottom. Use your hands to knead it until a satiny smooth ball of dough is formed. Roll out the dough on a lightly-floured surface until about 8mm thick. Cut out rounds about 6cm in diameter (I use a Moroccan tea-glass because I haven’t got a biscuit cutter) and place on a baking sheet lined with baking parchment. Bake in the oven for 20 minutes or until golden-brown.*

Remove from the oven and allow to cool for about 15 minutes on the tray – if you try to remove them immediately, they will crumble. Remove carefully to a cooling rack (I use flat tongs) and allow to cool completely. Break the chocolate into pieces and melt in a bowl over a saucepan of boiling water, ensuring that the water doesn’t touch the base of the bowl. Dip each biscuit into the melted chocolate so that half is covered and place carefully on a sheet of baking parchment. When you have covered all of the biscuits, put them in the refrigerator to set. These biscuits should keep for 4 or 5 days in an airtight tin.

*If your oven is anything like mine, it doesn’t bake evenly and I always seem to get one side of the biscuits really brown. I rotate the biscuits through 90° every five minutes and this seems to ensure an even bake.

A trip to the doctor’s to get the news from my coeliac screening blood test predictably revealed a negative result. I say predictably because apparently you need to have been eating gluten for at least six weeks prior to testing for the autoantibodies to be detectable in the blood. So I’m currently in limbo, waiting for my GP to check with the gastrointestinal consultant at the Bristol Royal Infirmary to see if the next steps are a gastroscopy and biopsies. Unfortunately, my doctor thinks that I may have to have eaten gluten during the past twelve months for any changes in the villi in my small intestine to be detectable. Potentially a week full of pastry, bread and pasta is rearing its ugly head. In the past, the thought of mandatory trips to Planet Pizza, bacon sandwiches made from tiger bread and Pieminister pies would have filled me with delight. Not this time.
Gluten-free orange and cardamom tart in a pistachio biscuit crust
This recipe takes its inspiration from Delia Smith’s recipe for Key Lime Pie in her book Delia’s How To Cook: Book Two.
Serves 8-10
For the base:
95g unsalted butter
175g gluten-free digestive biscuits
50g roasted, unsalted pistachios (shelled weight)
For the filling:
1 tbsp grated clementine zest (zest 4 clementines)
1 medium lemon, juiced and strained to remove pips and pulp
5-6 clementines, juiced and strained to remove pips and pulp
4 medium egg yolks
397g condensed milk
10 cardamom pods
You will also need a loose-bottomed tin, either flan or springform, with a diameter of 23cm, at least 2.5cm deep and a baking sheet.
Pre-heat the oven to 180°C (350°F)
Start by melting the butter over a very low heat. Using a food processor, whizz the pistachios until they are a coarse powder. Add the digestives and whizz them until they are coarse crumbs. Pour them into a mixing bowl and add the melted butter, stirring until they are well combined. Next, place this butter-crumb mixture into the tin and press it down firmly and evenly into the base. Place it on the baking sheet and bake on the centre shelf of the oven for 10 minutes, or until the crumb base is golden.
Lightly crush the cardamom pods on a board with a pestle to split them open. Scoop out the small seeds inside and crush them in a mortar until they are a fine powder. Place the egg yolks, clementine zest and ground cardamom seeds in a bowl and whisk with an electric whisk for about 2 minutes. The egg should have thickened and be a creamy pale yellow. Add the condensed milk and continue to whisk for another 4 minutes. Pour the lemon juice into a measuring cup or jug and add the clementine juice until it makes 150ml. Pour this into the milk and zest mixture and give another quick whisk to combine. Pour this on to the baked crust and return to the oven for another 20 minutes or until it feels just set when lightly pressed in the centre with your finger.
Remove from the oven, take the tin off the baking sheet and place it on a wire rack or heatproof surface. When it is completely cool, cover with clingfilm and chill until needed. Before serving, carefully remove the side ring of the tin, cut into slices and top with crème fraîche.
Notes from the Ledge

The secret to balancing it all is...well, I'll tell you if I ever figure it out.

mygijourney

The rise of a health nut

gf and me

Gluten Free Recipes & Tips

Bunny Eats Design

Happy things, tasty food and good design

sensitive flour

Gluten-free cooking, baking, eating

Little Gal in the City

Live and Love with your whole heart

No wheat please, I'm allergic

This WordPress.com site is the cat’s pajamas

wetinkpresspublishing

Pre-publishing Services for eBooks and Print Publications

afra cooking

taking pleasure in all things food

colour me happy kitchen

Because there's more than one way to make a cake.

gluten free zen

Taking The Stress Out Of Gluten-Free Grain-Free & Dairy-Free Living

charuyoga

vibrant inspiring health career yoga

Pizzi e Fichi

Lo style del buon gusto

Fabulously Free From

Living Gluten Free, fabulously!

DO NOT feed the back packer!

A diary of my interests, my travels and my quest to find good Gluten Free food! donotfeedthebackpacker@gmail.com

Mix It Up & Make It Nice

Amateur baker with a passion for eating!

My Blog

Just another WordPress.com site

Growing Up Gluten Free

Rantings, recipes, and reviews

Southerners in the Great White North

Ken & Becca's Canadian Adventure

thebeautyofthewrittenword

Smile! You’re at the best WordPress.com site ever

How Janey Learned Russian

Formerly "College Russian"

travels around my kitchen

Just live, read, eat and travel!

Making myself useful

Striving for daily self-accountability

The Foodies

Traditional and New Recipes for All Food Lovers

Gluten Free Gus

Baking Joy Into Every Gluten-free Bite

An Orange Kitchen

A year of food adventures in my Boston kitchen